Sunday, March 25, 2012

Basic XNA Post Shader Tutorial

So here's going to be a really simple, basic introduction to post shaders in XNA! If you aren't familiar with what a post shader is, try thinking of the popular special effects like Bloom, or Motion Blur. These are special effects that get done after the entire screen has been completely drawn! A shader or two is then used to manipulate the resulting image to do something cool.

In this example, I will show you how to do a simple single pass post shader using basic color information. More advanced techniques will use more than just color information, and use multiple layers of post shaders. So for this example, we're just going to invert the colors of the screen!

I'm going to start with a basic project that draws a simple model to the screen, you can follow this tutorial here, or just download this project as a starting point. If you just need a 3D model to get you started, you're also welcome to use these: glaive model, glaive texture.
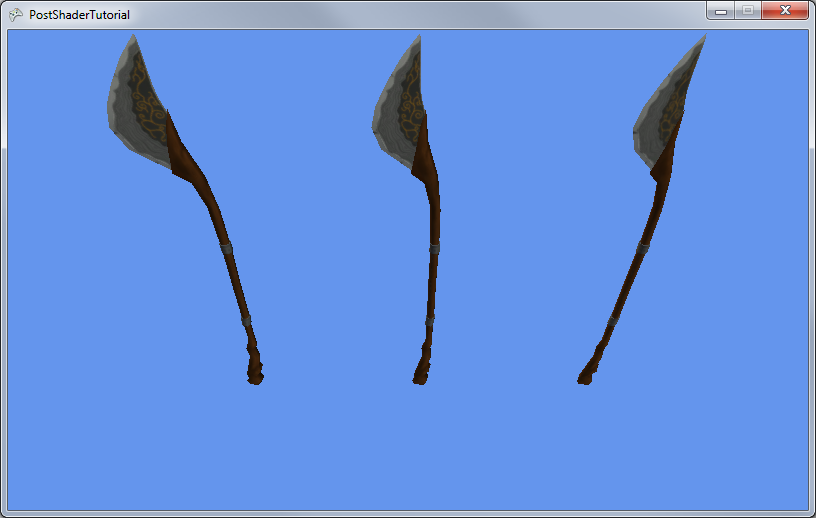

These are the things that we'll need to do to get this post stuff working:

  • Make a post shader
  • Load it
  • Create an off-screen surface to draw to
  • Draw to the off-screen surface
  • Draw the off-screen surface using the post shader
And fortunately, none of these bits are particularly hard. One or two might be a little arcane, but that's what webpage bookmarks and copy/paste are for ;)

We'll start at the top with defining our variables, so first! Define this in your Game1.cs, right below the GraphicsDeviceManager and SpriteBatch.

Effect         postShader;
RenderTarget2D offscreenSurface;

So the Effect will store our post shader, it's essentially the exact same thing as any other shader you might deal with, but the devil is in the details. You'll see exactly what I'm talking about when you get to the .fx file for it! The RenderTarget2D holds our off-screen surface, it's basically a Texture2D that's been specialized for having things rendered to it. You can also use it for things like mirrors or reflections on water, or even TV screens and security cameras!

Next would be initializing them. So in the Game1 LoadContent method, add these lines:

postShader       = Content.Load<Effect>("PostShader");
offscreenSurface = new RenderTarget2D(graphics.GraphicsDevice,
                                      graphics.GraphicsDevice.Viewport.Width,
                                      graphics.GraphicsDevice.Viewport.Height,
                                      false,
                                      graphics.GraphicsDevice.DisplayMode.Format,
                                      DepthFormat.Depth24);

We'll add in the PostShader.fx file shortly, but check out that constructor for RenderTarget2D! You can see there, we're specifying the viewport width and height. This tells it how large the texture we're storing for it will be. The values we're specifying here are exactly the same size of the window, but theoretically, we could make it smaller, or larger! Making it smaller could even be thought of as a performance optimization, as this texture will eventually get sampled up to the size of the window anyhow (I saw this as an option once in Unreal Tournament III, pretty spiffy!).

False there specifies no mip-maps, which would be pointless anyhow, since we aren't zooming in and out from the window. If you don't know about mip-maps, go learn about them, they're cool =D

The last two arguments specify to use the same color format as the screen, and a 24 bit zBuffer.

The remaining bit we need to code in C# is also pretty easy! At the top of the Draw method, add this line:

graphics.GraphicsDevice.SetRenderTarget(offscreenSurface);

Which should then be followed by whatever draw code you may have. What this line does, is tell the graphics card to draw everything from here on out to our specific off-screen surface! Instant awesome as far as I'm concerned~

Later in the Draw method, after base.Draw(gameTime), add in this remaining code:

graphics.GraphicsDevice.SetRenderTarget(null);

spriteBatch.Begin(SpriteSortMode.Immediate, 
                  BlendState.Opaque, 
                  null, null, null, 
                  postShader);
spriteBatch.Draw (offscreenSurface, 
                  new Rectangle(0, 
                                0, 
                                graphics.GraphicsDevice.Viewport.Width, 
                                graphics.GraphicsDevice.Viewport.Height), 
                  Color.White);
spriteBatch.End  ();

graphics.GraphicsDevice.DepthStencilState = DepthStencilState.Default;

The first line there clears the render target, letting the graphics card render to the screen again, instead of our off-screen surface.

The spriteBatch Begin allows us to set the card up for 2D drawing, and also lets us specify the shader as its last argument! This is the cool part, where we let the SpriteBatch do all the heavy lifting for us. Theoretically, we could create a quad with 3D geometry, set up a camera and a whole pile of things, draw our off-screen surface manually, but I've settled on this being the easiest way to get it done.

Drawing the off-screen surface is now exactly like drawing a regular 2D image onto the screen! Nothing complicated there =D

Then all the way at the end, we reset the DepthStencilState, as the SpriteBatch will change it for us when Begin is called. If we don't reset it, then we get all sorts of fun drawing artifacts in our 3D geometry.

The only thing that remains now is the shader! So right click on your content project and Add->New Item->Effect File, and call it "PostShader". Then completely replace the code there with this:

sampler TextureSampler : register( s0 );

float4 PixelShaderFunction(float2 UV : TEXCOORD0) : COLOR0
{
 float4 color  = tex2D(TextureSampler, UV);

 float4 result = float4(1, 1, 1, 1);
 result.xyz -= color.xyz;

 return result;
}

technique DefaultTechnique
{
 pass Pass1
 {
  PixelShader = compile ps_2_0 PixelShaderFunction();
 }
}

As you can see, this is where some strange things happen. There is no Vertex Shader in this effect file, just a Pixel Shader! We also aren't quite defining the sampler, merely pointing it to a register. Since we're taking advantage of the SpriteBatch for drawing our plane, we don't have to worry about those things. Our shader is almost like an override method, it just plops in and changes the behavior of the Pixel Shader only.

In this particular shader, the PixelShaderFunction gets called once for every single UV coordinate pair on the image you're trying to draw. The tex2D function then takes the UV coordinate and the sampler, and looks up the appropriate color, which we can then do whatever we like to =D


Now you can tweak it and play with it however you feel like!

You can download the completed tutorial project (with comments!) here.

Saturday, January 07, 2012

Basic XNA 3D Tutorial

This tutorial will cover drawing a basic 3D object using XNA 4.0 for Windows or Windows Phone 7. Fortunately, it's pretty darn easy! If you're not sure what XNA is or how to set it up, you may want to go through this tutorial right here (pending) ~

Setting Up

So! Getting started. First we'll need a model to draw to screen! XNA supports .x and .fbx files by default, you can write or find plugins for other formats, but that's for another day. Be careful! Not all 3D file exporters are created equal! If you export a .x or .fbx from an application with a sub-standard exporter, XNA can't always read it. If you're having issues, try exporting from multiple tools, or playing with settings. If you haven't got anything on hand, here's a textured model I made that should work no problem =D

Glaive Model
Glaive Texture

Create a Windows Game (4.0) or a Windows Phone Game (4.0) project from Visual Studio, from here, we'll need to add the model and texture to our project. Browse to your project's location, and go into the Content project's folder (If you have Visual Studio Professional, you can right-click on your project and say 'Open Folder in Windows Explorer'). Copy your model and your texture(s) into this folder. After that, from Visual Studio, right click on your content project, and say 'Add->Existing Item', and select only the .fbx file! (If your files don't show up in the default location, you've put them in the wrong spot.)

Note: The reason we don't add the texture, is because the model should automatically link to the texture, and XNA will compile it from that. If you add it in manually, XNA  will try compiling it twice. Once from the model link, and once from the manual addition. It's not a huge deal, but VS will give you a warning for it.


Code

Most of the code for this is pretty simple, definitely way more simple than what you used to have to do! I still have nightmares from DirectX 6 stuff.

We'll start by defining a variable to store our model in. This will go at the top of the Game1 class, right underneath SpriteBatch spriteBatch;
Model glaiveModel;
I've always thought it was pretty cool that the Model type contains everything you need to draw a model. It's got mesh information, material and texture stuff, textures, heck, it's even got BoundingSphere's hidden in it somewhere!


To load the actual model into this variable, we need to wait until the GraphicsDevice has been properly initialized (GraphicDevice is our interface to the computer's graphics card, and since graphics data like models and textures reside in the graphics card's RAM, we need to have access to it before we can load stuff). Fortunately, the Microsoft.XNA.Framework.Game automatically calls LoadContent right after it creates the GraphicsDevice! So, anywhere in LoadContent, add this line:


glaiveModel = Content.Load<M odel>("glaive");

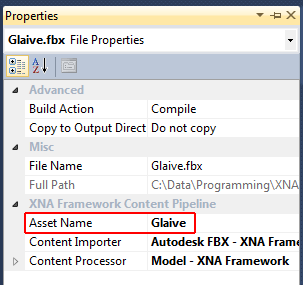
Content here is an object initialized by the Microsoft.Xna.Framework.Game, and is used to load and store most resources that your game will work with. If you're fuzzy on the odd <> syntax, you may wish to refresh a little on C# Generics. The string in this case refers to the model file itself! So if you're using something else, you'll want to change this. Something to note here, is that yes, there is no extension on that file name! This is because XNA's content system does some cool things. To visually see why, Right Click->Properties on your model in the content project. Note the Asset Name property.


And yes, you can change it.
By default, it's the name of the file minus extension. This is what Content.Load looks for specifically, so be careful if you change it. Please note! If you have two assets of different types with the same name, perhaps a texture and a model, you will get a name conflict! Changing the name of a texture just for that can be a bit of an irritation, so it's always nice plus to make sure that's covered during the modeling process.

The last part is a little bit more complicated, as it involves drawing the model. As simple as XNA might be, drawing 3D stuff is still a complicated task! But they've made it a darn sight simpler than it used to be, that's for sure. So! In the Draw method, right after the call to GraphicsDevice.Clear


Matrix[] transforms = new Matrix[glaiveModel.Bones.Count];
glaiveModel.CopyAbsoluteBoneTransformsTo(transforms);


foreach (ModelMesh mesh in glaiveModel.Meshes)
{
foreach (BasicEffect effect in mesh.Effects)
{
effect.EnableDefaultLighting();
effect.World      = transforms[mesh.ParentBone.Index] * Matrix.CreateRotationY((float)gameTime.TotalGameTime.TotalSeconds);
effect.View       = Matrix.CreateLookAt(new Vector3(3, 4, 3), Vector3.Zero, Vector3.Up);
effect.Projection = Matrix.CreatePerspectiveFieldOfView( MathHelper.ToRadians(45.0f), GraphicsDevice.Viewport.AspectRatio, 0.1f, 1000.0f);
}
mesh.Draw();
}


Wooh~


Matrix[] transforms = new Matrix[glaiveModel.Bones.Count];
glaiveModel.CopyAbsoluteBoneTransformsTo(transforms);


The first two lines are a little weird, and really, it took me forever to figure out exactly what was going on with it. The basic idea is that it's one last transformation that gets applied to your object from the modeling tool. Often it's just the 'object' transform, any rotation, translation, or scaling that you applied to your entire model back in Maya, or Blender or whatever. Also, 3D applications often use different internal representations of 3D space. Some of them will say the Y axis is up, some of them will say the Z axis is up... and all sorts of other strange variations on that idea. This last transform is a great place for them to correct into whatever is standard for the model format!


foreach (ModelMesh mesh in glaiveModel.Meshes)
{
foreach (BasicEffect effect in mesh.Effects)
{


After that, the two foreach loops just iterate through all the meshes and shaders/effects that are stored in the model. Yes, models will frequently contain multiple meshes in them! Most frequently, this is because they use different materials.


foreach (BasicEffect effect in mesh.Effects)
{
effect.EnableDefaultLighting();


The BasicEffect class is a default shader that XNA applies to all Models loaded in the regular fashion. It's just a nice, convenient tool to get you up and running really quick. Usually, this will get replaced by a custom shader/effect as your game gets more visually appealing. If you aren't sure what a shader is, it's basically a small bit of code that runs on the graphics card and describes exactly how 3D geometry gets transformed and lit/colored onto the screen, hence the light and position info.

effect.World      = transforms[mesh.ParentBone.Index] * Matrix.CreateRotationY((float)gameTime.TotalGameTime.TotalSeconds);


This bit here is the basic transformation information. As mentioned before, that first bit, transforms[mesh.ParentBone.Index] is just a reference to that last transform stored by the modeling tool, but the call to Matrix.CreateRotationY is actually going to give a rotation to the model around the Y axis based on time.


effect.View       = Matrix.CreateLookAt(new Vector3(3, 4, 3), Vector3.Zero, Vector3.Up);
effect.Projection = Matrix.CreatePerspectiveFieldOfView( MathHelper.ToRadians(45.0f), GraphicsDevice.Viewport.AspectRatio, 0.1f, 1000.0f);


These two lines deal with camera information. One of the issues with 3D space, is that you have to tell exactly where you're looking from. Frequently this can be kinda tricky, but fortunately, Matrix.CreateLookAt is a pretty easy solution for a really basic 3D scene. All you have to do is specify where the camera is, where it's looking at, and what direction is up! A little less intuitive is the projection, which describes how 3D information gets squished into 2D polygons that can then actually be drawn on your 2D monitor. The first argument is the field of view, which basically describes how much of the 360 degrees of space you can see at any given time. Computer math works with radians, rather than degrees, so we use a nice XNA utility to convert it for us. After that, it needs to make sure the polygons are stretched to match the width/height ratio, or aspect ratio of your monitor. The last two are the near and far clipping plane, or how close and how far can object be drawn without getting ignored.


mesh.Draw();


This one then, just takes all the settings provided, and draws to screen! Yay~!


I like to think it's a nice model too =D
You can find the entire project for download right here. If you aren't doing the phone thing, and it's giving you issues with that, the easiest way to fix it is to right click on Basic3DTutorial WP7 in the solution Explorer, and say 'Unload Project'

Sunday, December 11, 2011

SceneGraph Sample

So, scene graphs! I used to love the darned things, but now I have some mildly mixed feelings on them. Regardless, they're still pretty awesome, so I whipped up a quick bit of sample code! (Full source can be found at the bottom of the article)

But first, a quick description of what a scene graph is. It's basically a tree-like structure used to represent the data in your game's scene. The advantage of using a tree structure, is that you can use the parent/child relationship to inherit information, like position and orientation! This can make it extremely easy to do things like... stick arrows into people's knees! Or a helmet on top of your player's head, y'know, possibly even things like containers and inventories.


Just re-using an illustration I made last time I talked about scene graphs. It's still pertinent ;)

As it so happens, it's not all that hard to do this through code. So here's a quick 3D example of using a scene graph inside of XNA 4.0.

It's impossible to use a DrawableGameComponent for our scene graph nodes, primarily because the LoadContent method is declared as protected, but if you're familiar with XNA, then you'll notice that the SceneNode class very much resembles a DrawableGameComponent.


class SceneNode
    {
        #region Fields
        /// <summary>
        /// A list of child SceneNodes underneath this node.
        /// </summary>
        List<SceneNode> mChildren;
        #endregion

        #region Properties
        /// <summary>
        /// Our link back to the game that created us, allows us to add content and the like
        /// </summary>
        public Game        Game      { get; protected set; }
        /// <summary>
        /// The parent node in the SceneGraph heirarchy, if this is null, then it has to 
        /// be the top item in the tree.
        /// </summary>
        public SceneNode   Parent    { get; protected set; }
        /// <summary>
        /// A 3D location and orientation! Does cool things, check it =D
        /// </summary>
        public Transform3D Transform { get; set; }
        /// <summary>
        /// Sets whether or not this node is drawing. Defaults to true.
        /// </summary>
        public bool        Visible   { get; set; }
        /// <summary>
        /// This sets if the node will actually update and draw, it might be a productive 
        /// idea to attach an event of some sort to this property. Defaults to true.
        /// </summary>
        public bool        Enabled   { get; set; }
        /// <summary>
        /// This is the transform matrix that takes into consideration all of the parent
        /// node locations.
        /// </summary>
        public Matrix      TransformMatrix
        {
            get
            {
                if (Parent == null)
                    return Transform.Transform;
                else
                    return Transform.Transform * Parent.TransformMatrix;
            }
        }
        #endregion

        #region Constructor
        /// <summary>
        /// Basic constructor, copies and initializes values
        /// </summary>
        /// <param name="aGame">A link to the game that created us!</param>
        /// <param name="aParent">The parent node for this SceneNode, can be null to indicate a top level SceneNode</param>
        public SceneNode(Game aGame, SceneNode aParent)
        {
            Game      = aGame;
            Parent    = aParent;
            Visible   = true;
            Enabled   = true;
            mChildren = new List<SceneNode>();
            Transform = new Transform3D();

            // if there is a parent object, add this object to the parent's children
            if (Parent != null)
                Parent.mChildren.Add(this);
        }
        #endregion

        #region Virtual methods
        public virtual void Initialize ()
        {
            // initialize all child nodes
            for (int i = 0; i < mChildren.Count; i++)
                mChildren[i].Initialize();
        }
        public virtual void LoadContent()
        {
            // load content for all child nodes
            for (int i = 0; i < mChildren.Count; i++)
                mChildren[i].LoadContent();
        }

        public virtual void Update(float aTime)
        {
            // update andy child nodes that are actually enabled
            for (int i = 0; i < mChildren.Count; i++)
                if (mChildren[i].Enabled)
                    mChildren[i].Update(aTime);
        }
        public virtual void Draw  (float aTime)
        {
            // draw them if they're visible, and enabled
            for (int i = 0; i < mChildren.Count; i++)
                if (mChildren[i].Visible && mChildren[i].Enabled)
                    mChildren[i].Draw(aTime);
        }
        #endregion
    }

And that's reasonably straightforward, there's really nothing all that tricky in there. After that's out of the way, all you need to do is.. either inherit from it, or set up a component system! Inheritance is the easiest, so here's an example of a basic 3D object that uses the SceneNode.


class Basic3DObject : SceneNode
    {
        #region Fields
        string mModelName;
        Model  mModel;
        #endregion

        #region Constructor
        public Basic3DObject(Game aGame, SceneNode aParent, string aModelName)
            : base(aGame, aParent)
        {
            // store for loading later
            mModelName = aModelName;
        }
        #endregion

        #region Overrides
        public override void LoadContent()
        {
            // load the model we have stored!
            mModel = Game.Content.Load<Model>(mModelName);

            // need this still, that way any child objects can still get loaded
            base.LoadContent();
        }

        public override void Draw(float aTime)
        {
            // Copy any parent transforms.
            Matrix[] transforms = new Matrix[mModel.Bones.Count];
            mModel.CopyAbsoluteBoneTransformsTo(transforms);

            // Draw the model. A model can have multiple meshes, so loop.
            foreach (ModelMesh mesh in mModel.Meshes)
            {
                // This is where the mesh orientation is set, as well 
                // as our camera and projection.
                foreach (BasicEffect effect in mesh.Effects)
                {
                    effect.EnableDefaultLighting();
                    effect.World      = transforms[mesh.ParentBone.Index] * TransformMatrix;
                    effect.View       = Camera.ViewMatrix;
                    effect.Projection = Camera.ProjectionMatrix;
                }
                // Draw the mesh, using the effects set above.
                mesh.Draw();
            }

            base.Draw(aTime);
        }
        #endregion
    }

And again, you can see it behaves almost exactly the same as a regular DrawableGameComponent! So it's not all that different from what you've already been working with~ Lastly, putting it all together in an example:

Spinning spaceships! Not the most practical thing, but hey.


public class Game1 : Microsoft.Xna.Framework.Game
    {
        GraphicsDeviceManager graphics;
        SpriteBatch spriteBatch;

        // scene nodes, for easy access
        SceneNode mRoot;
        SceneNode mCenterShip;
        SceneNode mMiddleShip1;
        SceneNode mMiddleShip2;

        SceneNode mOuterShip1;
        SceneNode mOuterShip2;
        SceneNode mOuterShip3;
        SceneNode mOuterShip4;

        public Game1()
        {
            graphics = new GraphicsDeviceManager(this);
            Content.RootDirectory = "Content";
        }

        protected override void Initialize()
        {
            mRoot = new SceneNode(this, null);

            // set up a large ship in the center, everything will rotate around it
            mCenterShip = new Basic3DObject(this, mRoot, "Ship");

            // set up two orbiting ships, note that their parent is mCenterShip
            mMiddleShip1 = new Basic3DObject(this, mCenterShip, "Ship");
            mMiddleShip1.Transform.Position = new Vector3(500, 0, 0);
            mMiddleShip1.Transform.ScaleSc  = 0.5f;
            mMiddleShip2 = new Basic3DObject(this, mCenterShip, "Ship");
            mMiddleShip2.Transform.Position = new Vector3(-500, 0, 0);
            mMiddleShip2.Transform.ScaleSc  = 0.5f;

            // set up two orbiting ships per orbiting ship, note how the scale is the same,
            // but when running, they're still smaller.
            mOuterShip1 = new Basic3DObject(this, mMiddleShip1, "Ship");
            mOuterShip1.Transform.Position = new Vector3(500, 0, 0);
            mOuterShip1.Transform.ScaleSc  = 0.5f;
            mOuterShip2 = new Basic3DObject(this, mMiddleShip1, "Ship");
            mOuterShip2.Transform.Position = new Vector3(-500, 0, 0);
            mOuterShip2.Transform.ScaleSc  = 0.5f;
            mOuterShip3 = new Basic3DObject(this, mMiddleShip2, "Ship");
            mOuterShip3.Transform.Position = new Vector3(500, 0, 0);
            mOuterShip3.Transform.ScaleSc  = 0.5f;
            mOuterShip4 = new Basic3DObject(this, mMiddleShip2, "Ship");
            mOuterShip4.Transform.Position = new Vector3(-500, 0, 0);
            mOuterShip4.Transform.ScaleSc  = 0.5f;

            // do a really simple, easy camera setup
            Camera.ProjectionMatrix = Matrix.CreatePerspectiveFieldOfView(MathHelper.PiOver2, 800f / 480f, 0.1f, 2000f);
            Camera.ViewMatrix       = Matrix.CreateLookAt(new Vector3(500, 500, 500), Vector3.Zero, Vector3.Up);

            base.Initialize();
        }

        protected override void LoadContent()
        {
            // Create a new SpriteBatch, which can be used to draw textures.
            spriteBatch = new SpriteBatch(GraphicsDevice);

            // only need the one call, everything gets passed down, since it's a SceneGraph =D
            mRoot.LoadContent();
        }

        protected override void Update(GameTime gameTime)
        {
            // Allows the game to exit
            if (Keyboard.GetState().IsKeyDown(Keys.Escape))
                this.Exit();

            // rotate the very middle ship, which should rotate all the ships, based on the SceneGraph architecture
            if (Keyboard.GetState().IsKeyDown(Keys.Q))
            {
                mCenterShip.Transform.Rotation += new Vector3(0, 0.05f, 0);
            }
            // rotate the middle ships
            if (Keyboard.GetState().IsKeyDown(Keys.W))
            {
                mMiddleShip1.Transform.Rotation += new Vector3(0, 0.05f, 0);
                mMiddleShip2.Transform.Rotation += new Vector3(0, 0.05f, 0);
            }
            // and lastly
            if (Keyboard.GetState().IsKeyDown(Keys.E))
            {
                mOuterShip1.Transform.Rotation += new Vector3(0, 0.05f, 0);
                mOuterShip2.Transform.Rotation += new Vector3(0, 0.05f, 0);
                mOuterShip3.Transform.Rotation += new Vector3(0, 0.05f, 0);
                mOuterShip4.Transform.Rotation += new Vector3(0, 0.05f, 0);
            }

            // only need the one call, everything gets passed down, since it's a SceneGraph =D
            mRoot.Update((float)gameTime.ElapsedGameTime.TotalSeconds);

            base.Update(gameTime);
        }

        protected override void Draw(GameTime gameTime)
        {
            GraphicsDevice.Clear(Color.CornflowerBlue);

            // only need the one call, everything gets passed down, since it's a SceneGraph =D
            mRoot.Draw((float)gameTime.ElapsedGameTime.TotalSeconds);

            base.Draw(gameTime);
        }
    }

So hopefully that's at least a little bit informative =D The full source code includes a few extra things not shown above, so check it out!

Source code can be downloaded here

Friday, December 09, 2011

Scripting

So I was recently linked to an article about using scripting languages instead of 'real' languages. tl;dr, he talks about how scripting languages are just as powerful, just as fast, and frequently use a simpler syntax. They also compile separately, and can literally be treated as content, almost like a texture, or a map.

But, he somehow managed to briefly brush past the biggest reason why scripting languages are important to game development. They allow you to code for your game using a far higher level of abstraction! This is especially true for custom scripting languages, created for a specific game, a whole genre of games, or merely for games in general. One of my favorite examples of this is Age of Empires II, a game I spent significant amounts of time building and testing AI scripts for.


Though technically, I preferred it without the expansion. Martyrdom made monks really boring.

The fun thing is just how simple AI scripting is for AOE II. It lets you completely define the personality of the AI player, the style they play in, their priorities, the types of troops that they build, and on and on. Here's a quick snippet of what the language looks like:

(defrule
(strategic-number sn-minimum-town-size == military_townSize_1)
(soldier-count < military_townSize_army_1)
=>
(chat-local-to-self "Lowering town size to level 0.")
(set-strategic-number sn-minimum-town-size military_townSize_0)
(set-strategic-number sn-maximum-town-size military_townSize_0)
)

;Attack Now
;start timer
(defrule
(true)
=>
(chat-local-to-self "Activating attack delay timer.")
(enable-timer military_timer_attack_delay 1)
(disable-self)
)

;acknowledge timer w/ other conditions
(defrule
(strategic-number sn-minimum-town-size == military_townSize_6)
(not(enemy-buildings-in-town))
(timer-triggered military_timer_attack_delay)
=>
(chat-local-to-self "Attacking without town size attack.")
(chat-to-allies "31 Attack an Enemy Now")
(attack-now)
(disable-timer military_timer_attack_delay)
(enable-timer military_timer_attack_delay military_attack_delay_min)
)

As you can see, the syntax is extremely simple, almost LISP-like, but it's set up in a fashion where it's incredibly easy to define rules for the AI to follow. AOE II still uses an AI framework built into the game itself, but it does that to simplify the scripts that people would work with on a more frequent basis. It does mean there are a few things that are impossible for the scripter to change the behavior of, but that's alright in moderation.

Compare the above snippet with this bit from an XNA game that I'm currently working on.

case AIState.Check:
{
 AIFish fish = FindFish();
 if (fish != null)
 {
  target = fish;
  if (fish.size > size)
  {
   state = AIState.Run;
   stateTime = (float)gameTime.TotalGameTime.TotalSeconds + 3 + RandomUtil.CreateFloat(0, 2);

   Vector2 runDir = -(target.position - position);
   runDir.Normalize();

   dest = position + runDir * 400 * size + RandomUtil.CreatePoint(new Rectangle((int)(-200 * size), (int)(-200 * size), (int)(400 * size), (int)(400 * size))); 
  }
  else
  {
   if (RandomUtil.CreateFloat(0, 1) > 0.5f)
   {
    state = AIState.Hunt;
    stateTime = (float)gameTime.TotalGameTime.TotalSeconds + 3 + RandomUtil.CreateFloat(0, 2);
   }
   else
   {
    state = AIState.Wander;
    stateTime = (float)gameTime.TotalGameTime.TotalSeconds + 4 + RandomUtil.CreateFloat(0, 2);
    dest = position + RandomUtil.CreatePoint(new Rectangle((int)(-200 * size), (int)(-200 * size), (int)(400 * size), (int)(400 * size)));
   }
  }
 }
 else
 {
  state = AIState.Wander;
  stateTime = (float)gameTime.TotalGameTime.TotalSeconds + 4 + RandomUtil.CreateFloat(0, 2);
  dest = position + RandomUtil.CreatePoint(new Rectangle((int)(-1000 * size), (int)(-1000 * size), (int)(2000 * size), (int)(2000 * size)));
 }
} break;

Yeah, definitely not my prettiest bit of code, but that seems to be a theme with basic Finite State Machines when I code them. Imagine if I set up a basic framework, and did this in a custom scripting language? Quite possibly, I could reduce this into 3-4 lines of script, and easily swap out for different fish, types of fish, or even fish with different personality. When you have a really simple scripting language with which to express your ideas, then it suddenly becomes far easier to express more complex thoughts!

I think I'm going to leave it at that, there's plenty of other thing that the author of the article left out or glazed over, but I think this was one of the more important bits. Thanks for reading~

Sunday, April 10, 2011

FerrScript

Well, I just released my FerrScript library up on CodePlex! I'm pretty excited, I think it's pretty fantastic~
Check it out!

http://ferrscript.codeplex.com/

Tuesday, March 15, 2011

ImagineCup Spring 2011

I've participated in the last 3 ImagineCup competitions, it's a great competition, and it definitely pushes me to work towards something great on a deadline. This is actually the first time my team has decided to go 2D instead of 3D, so it was a little different for me this time around. This also means I now have a delightfully fantastic framework for making 2D games in the future!


New World Africa was my first IC game, and it took Danny and I to the world finals in Cairo, Egypt.

This is also the first time I didn't just land in the middle of a team, I get to work with a couple members from Team To Be Announced, who won last year's US ImagineCup with Sixth. All of them are delightfully talented, so they're a lot of fun to work with.


Qualia was my second IC game, which honestly was quite a masterpiece... too bad the judges didn't agree.

Another new thing for me, was that I wasn't making my own world editor for once. The nice thing about 2D games is that there's a lot more resources for building worlds in a generic enough format. We used the delightful Tiled editor for making maps, and I couldn't have been happier with it! I'm planning on making it an integral part of my framework, and using it in future projects I have in mind.


Split Reality is the working title for our current game. We'd have changed it by now, but other things are more important.


We went for a pixel art style, which I think is one of the better ideas we had for the project. It really made it easy to fill the screen with stuff and create new art resources quickly. That's another thing I'm going to remember for the future! It's almost like cheating, except it still looks good =D


Yay for cutscenes! We have another one, but it still needs some cleaning up.

I've got a list of things I still need to code for the project... Prefabricated objects for one, Tiled is a nice editor, but it's a horrid environment to be designing game objects inside of. A cleaner event system, I had to hack the current one in before Spring break got started, so it's a fair bit messy. I also want to do a little more with the cutscenes, pathing, loading from file and all that good stuff. I might even bring in an old cutscene editor I made for Zimbie the Zombie, a game I worked on for my first Game Jam.


Everything came together in such a short amount of time, why, oh why did I start with 3D games?


He does the "Master Chief jump", as Nic says. A better prefab system would help with that >.>

We also had a smashing video for the judges. We'll see if it gets us through to the next round. I'm not counting on it, it wasn't quite where we wanted it to be by the deadline... but you never know! If it doesn't, I can take the stuff I've learned so far, and start chowing down on Umbra, which I've been itching to work on for a while.

Monday, March 14, 2011

Unity Videos

I just made a video introducing some of the basic elements of Unity. I'm kinda excited, I don't do video stuff all that often =D Two parts on Youtube!

Part One


Part Two

Sunday, March 13, 2011

Being a Game Designer

Making games! What a dream that would be! It's actually quite hard for me to imagine why someone wouldn't want to make games for a living, it's just too fun. However, a lot of people have a bit of a delusion that it's a simple thing to do. It's a lot easier than it used to be, but it's still not necessarily easy! If you want to design a game, you've gotta learn a few things first.

First things, what role does the game designer play? Their primary role is to make sure that the game is fun and plays well! Another important role is to describe exactly what the game is, documented, in a way that the team can see it, refer to it, and rely on it. They also need to make certain that everyone on the team knows for sure what the game is.

Skills

The game designer's primary skills revolve around communicating their ideas to other people

Writing
Documentation and communication begin with writing! This is just basic, rudimentary literacy. Make sure you can form sentences and spell. It's surprising how often people lack this skill, but it's probably one of the most important skills for a game designer. Beyond that, a good game designer would be an extremely competent writer, especially for story based games, but also to ensure that documentation is clear, concise, and difficult to misinterpret.

Drawing
Sometimes communication with words just doesn't cut it, being able to clearly sketch an idea out can help tremendously with illustrating an idea. You don't have to be a master painter for this, you just need to be able to sketch things so other people can recognize them clearly. Learning basic drawing skills isn't all that difficult, and it can give you a delightfully new perspective, not just enhance your ability to show people your ideas.


It doesn't have to be gorgeous, but it should get the idea across

Programming
Prototyping is the key for making games fun. Fun doesn't just pop out of midair, or happen on the first try, it has to be found, cultivated, and carefully tweaked! Being able to work with a tool like Game Maker can help with the early stages of development, when ideas are still up in the air, and being able to work with someone else's code for programming or tweaking game-play mechanics. If you're working with a game that supports scripting, you should be able to script with whatever it might be. Programming is important even for a designer, and you shouldn't be afraid to dive into it.

Respect

An extremely important item in any team is respect, but especially in the case of the game designer. You see, everyone goes into game development with their own ideas, not just the designer! Why should they even be interested in making your idea come to life, instead of theirs? You have to be an important asset to the team, or they'll go off and make their own game without you.

The easiest way to get respect as a designer, is to specialize in an additional skill. While it may be rare to find someone who can design with true skill, it's downright common to find someone who can design a game. Ideas are cheap, writing is something we're taught from birth, and communication is the foundation of our lives.

Imagine this scenario, with a game programmer who has dedicated his life to coding, and a designer, who has an absolutely fantastic game idea:
Designer, "I've got this fantastic idea for a game! Would you like to work with me to make it?"
Programmer, "Cool idea, but what skills do you bring to the table?"
Designer, "I have lots of ideas, and I'm a great designer!"

At this point, the programmer will:
A. Strangle the designer
B. Tell the designer just what he thinks about 'Idea people'
C. Politely decline, go home, and write a strongly worded blog post about the encounter


Some programmers get angry, you wouldn't want this to happen to... you, now would you?

The problem is, being a programmer, or an artist, or a sound engineer takes a lot of technical knowledge and skill, in addition to the skills the designer has already claimed as his own! Let's just say that's a pretty bad first impression.

If you're a born leader, and you have people following you just because you're awesome, pick up some people management skills, that's all you really need. *lucky bastard*

So...

Get those basic skills down, and then pick up a specialty... work hard, and pay attention to details. Learning is a fun experience, especially when it comes to game development!

Sunday, February 27, 2011

Tile Based Games

If you looked at a collection of 2D games, how many of them do you think would use a tile based system for drawing their environments? I'm going to hazard a random guess and say, "lots". So, if this is pretty standard stuff, why re-invent the wheel? Well recently, one of my awesome students pointed out a pretty fantastic tool and code library to me that does tiled maps -quite- well. I like enough that I'd probably use it in any of my own 2D projects, and would recommend it to anyone else.


The Tiled map editor in action, incredibly simple, incredibly powerful.

The map editor, Tiled, does everything it needs to, and nothing really more. It works with multiple layers of tiles, as well as simple object layers for placing objects that don't quite qualify as tiles. You can attach your own custom properties to any tile, layer or map in your project, so that you don't actually need any other editor to design your project in.

The designer allows you to fill areas with a paint bucket, as well as select multiple tiles to place simultaneously, a pair of features that greatly increase work speed for designing your maps. Hotkeys are provided for all commands, so with a little bit of practice, you should be able to iterate through map designs in minutes!

Also, did I mention that their undo history is killer? It really is, give it a try =D For documentation on the application, check out their wiki.

Integration with XNA

The editor by itself is fantastic, but half the problem is getting the stuff from the editor to the screen. Fortunately for everyone involved, a fellow by the name of Gareth Williams wrote a fairly friendly framework for loading/displaying/working with files generated from Tiled in XNA 4.0.

While I have not spent extensive amounts of time with this framework yet, a cursory glance reveals some pretty cool things, and some fairly solid code. Even better is that large parts of his code are based on widely popular and easily accessible tutorials. He's also quite amiable to the idea of other people using this code too, which is always a plus. Here's a link to the relevant posts from his blog. I strongly recommend at least checking it out, it could save you a world of time!

Links

Tiled editor
Tiled editor Wiki page

Gareth Williams Tile Engine
Game State Management Sample (used in the Tile Engine)
Nick Gravelyn's commentary on TiledLib, and TiledLib itself (also used in the Tile Engine)

Monday, February 21, 2011

Chrome OS Review

Alright! So just recently, Google gave me a netbook! Pretty fantastic, right? I love these guys... So anyhow, I've been using it for a week or two now, and I think it's high time for me to have come up with some opinions about it~

Hardware

I'm going to touch on hardware first, as that's a reasonably good introduction to the device. First! Some specs:

Processor: Intel Atom @ 1.66 GHz
RAM:       2GB DDR3
HD:        16 GB Solid state drive
Screen:    1280x800
Graphics:  integrated


So keep in mind that this device is not the biggest powerhouse on the block. The casing itself though feels quite spiffy, the matte rubber coating on it feels great, and the mouse pad is almost as good as my Macbook Pro's.


The device is quite small, 12", completely dwarfed by my 23" monitor in the background


ChromeOS


The idea behind the operating system is to live completely on "the cloud", this magical location somehow made up of Internet, and honestly, I don't think Google could have timed it better. At this point, most of us are getting pretty used to doing things online, especially with the rise of Facebook as a platform for so much of our social data, and Dropbox for storing our files across multiple computers. What I'm trying to say is that living on the cloud completely isn't all that far-fetched.

Good things

I just want to say, the way I work on my computers in general has already changed, even after only a mere few weeks. I find myself relying far more on web based applications, especially for quick or simple tasks. It's hard to beat the convenience of having your workspace in a web tab, right next to your research information, and the site you're going to put your work on. I've also spent a fair bit more time on Google Docs, which really is quite delightful, especially with all of their recent changes.

If you've used Chrome on your desktop computer, you should have a collection of bookmarks, web apps, settings, and user preference data, and if you've set it up right, that data should be associated with your Google account. All of that data gets transfered over to the ChromeOS, and is constantly synced between whatever devices you have running chrome. Not having to worry about transferring data between computers allows the ChromeOS to fall perfectly into a support role for your main computer.

The interface to the OS is incredibly simple, and rather intuitive. It literally is almost exclusively your web browser. If you've used Chrome, you've already seen the interface. If you haven't, then you should, Chrome is a great browser =D The OS also has some pop-up tabs for things such as a download browser and gTalk windows, which are incredibly convenient, and rather unobtrusive.

One of my biggest apprehensions about using ChromeOS was not being able to code. I'm a coder, and I can't do without it. But I quickly found that it's not that hard to do web development online. There are plenty of web based web development tools, and even a few web based compilers that will compile applications in a wide range of different languages(Ideone is pretty nice). They might have to lean a little on the simple side, console windows, fixed input and the like, but it's definitely a start. Just the other day, I found myself writing code in a web window on my main computer, even though I had a couple copies of Visual Studio up in the background. I was pretty surprised.

Also, Teminal window! (Ctrl + Alt + t)

Bad things

Lets start with some simple things, like renaming files. While working on the cloud is great and all, files will eventually end up on your computer in some fashion or another, whether it be uploading pictures from SD card, or downloading from Google Docs to upload back into a class file submission, you still need to work with files. I'm OK with that, and they do have a file browser and all that fun stuff, but you can't rename files. Pretty simple, but important.

Chrome allows for multiple windows, each with multiple tabs. I think its pretty great, but each of these windows is fullscreen, so there's no way to drag tabs between windows. It would be nice to be able to right click on a tab and say 'move over one window' or some such. Google also doesn't do the standard alt+tab that Windows does, it merely rotates through, rather than switching between the most important windows first. There's a reason why Microsoft does it the way they do, and Google should pay attention in this case.

Plugins! Flash is built in, that's cool... but the web runs on more than Flash these days! For example, Silverlight. ChromeOS is built on top of Linux, and there is a Linux plugin for Silverlight out there. ChromeOS can't install or run it though. Same goes for Java, doesn't work. That's a bit of a big problem.

HURG @.@ THIS THING IS SLOW. Can't play video well, can't play games without lag... I hate integrated graphics chips... General use is quite fine otherwise. (Gawker doesn't count anymore, they just screwed up)

Also, Terminal window was nerfed :'(

Conclusion

Overall, I rather like the ChromeOS, and I really believe it's the future. The problems that I've pointed out so far are small details easily fixed by a quick patch, and the good parts really shine through to make the experience quite great. I'm not ditching my Windows 7 yet though we've still got a long ways to go... but it sure does make a great support computer in the meantime!

Tuesday, February 15, 2011

Programming Side Effects

Alright, so it's not often I actually benefit from programming classes, but every once in a while, a teacher sparks off an idea. Today that idea was side effects! This is a concept related to style and modularity, as well as a little bit of math.

Traditionally in math, when you call a function, you get a value back, f(x) = y. Going further, these results should be communicative, f(x) + g(x) = y and g(x) + f(x) = y. In programming however, this is not the case. All sorts of additional values can come in and contaminate the purity of the math based idea of functions, global variables like time and random seeds, and nearby variables that track the internal state of a class. All of these affecting values are called "Side Effects".

Here's a quick example:

#include <stdio.h>

int a = 0;

int Func1()
{
 a += 2;
 return a;
}
int Func2()
{
 a *= 4;
 return a;
}

int main()
{
 printf("%d\n", Func1() + Func2() );
 printf("%d\n", Func2() + Func1() );
}

In this case, you can easily see the side effect variable 'a', which completely destroys the predictability of the code. The problem is, this functionality is incredibly important to larger more complicated programs, which is why large amounts of effort is expended to do such things safely. This results in properties, get/set methods, and all manner of other things.

So it's something to think about when coding and to avoid if you can. It may even be a good thing to mark them down and keep track of in the comment docs, so you know which functions are less likely to be causing issues.

Just some food for thought =D

Sunday, February 06, 2011

Scene graphs vs. regular lists

When I first got into game development, I used simple lists to hold everything in my game. It worked out quite well, it was simple, and it wasn't overly complicated. But like any programmer, I have an insatiable desire to improve my code, to make things more powerful and flexible. It didn't take me long to find out about scene graphs, which is a remarkably intuitive and powerful way to store my game objects.

In case you aren't familiar with the idea of the scene graph, I highly recommend looking into it, even if you ultimately end up not using it, it's a good thing to at the very least consider.


An example of a simple scene graph, illustrating a child/parent relationship for position and more

However, I recently encountered the Unity editor, learned it, and worked with it extensively, and discovered that they don't seem to use a scene graph. The only parent/child relationships going on appeared to be done primarily through the transform components exclusively.

Now I thought this was a pretty intriguing idea, and with my recent focus on extreme simplicity in coding, I thought, "Well why not? A scene graph does make things more complicated and difficult to search through..." and the train suddenly left the station. What if I returned to using a simple list to represent my scenes?

Returning to the earliest example of a scene graph that I had seen, Morrowind, I suddenly realized something. Morrowind is a huge game, having to represent seamless landscapes that cover large amounts of land. Fitting all that data into a single list is impossible, and more or less has to be stored in a hierarchical fashion to facilitate loading.

Now, while I would love to make games on the scale of Morrowind, as an independent hobbyist developer, I don't. Mine are extremely small levels that are easily represented by a basic list, isn't a scene graph overkill? I think it is.

I'm working on a 2D framework for ImagineCup 2011, and have already started implementing this idea. I guess we'll see how it goes =D

Friday, November 13, 2009

Memory Management Workshop


These are the files to go with the presentation, just a quick implementation of some of the topics discussed.

Tuesday, October 13, 2009

Fall '09 CodeCamp

Here's a link to the files I use for the presentation, and a little link to a presentation that I frequently use alongside the material.

And a quick screenie of the sample running :)

It spins, and makes Xbox controllers vibrate, what more could one ask for?

Right now I'm having a few issues with uploading the rest of the files to my site, so for now, if you want them, please e-mail me, and I'll send them to you. I'll get them uploaded here asap, thanks for understanding :)

Thanks a bunch for attending, if you did. If you have any additional questions, my email is Nick.Klingensmith@cpcc.edu, I'll probably get back to you within a day.

Sunday, September 27, 2009

Eskil Steenberg on Technology

Alright, so here is Eskil Steenberg's talk on a vast number of incredible topics. He starts off talking about his project, and some of the technology in it, demos them a bit, and then goes on into some of his toolsets. And honestly, I view Eskil as a harbinger of change in the game development industry, so there's always some gem in what he has to say (or perhaps a whole pile of them).

One of the things he talks about here, is his terrain. If you've ever seen a screenshot from his game, you'll notice that he has -tons- of hard edges, cliffs and caves. This is pretty hard to do using traditional terrain methods, so it's pretty cool to get the rundown on how he does it. The first thing that he does, is he stores not just one height value per vertex, but four, one for each of the connecting squares. This allows him to create sharp edges and drop each quad up or down. That's probably sufficient for most things, but he goes a step further, and adds in a boolean value if there's a 'cave' or whatnot underneath it, and then he stores another 4 height values. Probably not the paragon of memory efficiency, but it should probably work out just fine. It's also then limited to just one level of caves in the terrain, which while not a big concern, is still something that's there. You could definitely use that as a jumping point for some pretty stellar technology :)

As you can see here, cliffs and sharp drops are pretty characteristic of the game, and they look quite stunning

His ideas regarding creating content are also pretty fantastic, and something far more developers should pay attention to. His idea, in a nutshell, is to create less unique content, and create procedural ways to make it appear more unique. The less you have to do by hand, the faster it becomes to make things.

He also considers the people that -do- have to still make things by hand, (obviously, that will always be something that needs done) and says that they really shouldn't have to work hard to do the things that they do. Right now, the modeling tools industry is completely controlled by Autodesk, so innovation in modeling tools is at an all-time low. Maya and 3DS Max haven't changed all that much over the past decade or two (per Eskil's claims) still retaining the basic fundamentals. Where is the innovation? Where is the change?

His toolset is very much devoted to these ideas, he has an incredible modeling tool that takes advantage of Verse to streamline content management and rapid prototyping, and which also allows him to do things that so many other modeling applications can't. Instead of grids and buttons, he's simplified the user interface down to the mouse and a few small directional pop-up menus. Yet even these small options allow the content creator far more control over their model than any of the major modeling tools do.

Loq Airou is Eskil's own modeling tool, which is an incredibly fantastic tool

Now, while this in particular addresses issues specifically in game development, it's also an issue that should be considered outside of game development as well. With all this technology that we have, how much of it actually increases our productivity..? We need to make sure that as we progress into the future, the things that we create still drive us in a productive direction. Not enabling us to become lazy, but to simplify or abstract menial tasks so that we can direct our minds towards more productive items.

Monday, August 24, 2009

Particle Systems, and Pixel Fill vs. Vertex Count

Ok, so here's me just spitting some of my thoughts out. I haven't yet implemented a particle system for my framework just yet, so it's still pretty pertinent.

So! First thing to know about drawing on a graphics card, which anyone who's familiar with rendering will know, is that graphics cards deal better with a few large chunks of draw data, rather than a lot of small chunks. So with a particle system of 10,000 particles, there's no way you want to have 10,000 different draw calls. So instead, you zip them all up into a single vertex buffer, and do some magic on the graphics card.

This is fantastically simple for billboards... but when I talk about particle systems, I'm including static particles, like grass, plant fronds, leaves, and possibly even rocks and ambient objects. As you can see, that gets a lot more complicated really fast. Complex geometry, abstract orientation, possibly even procedural animation!

An image (Oblivion) illustrating a scene full to the -brim- with static particles.

It might just be best to keep static particles at least mildly separate from the dynamic particles, simply because of how different they are from eachother. But I'll see just how re-usable the code is when I get there!

And as a note, or rather, the thought that inspired this entire post :/ developers actually spend the extra vertices on rain to do individual droplets! Evidently, it's faster that way, since they don't have to worry about all the transparent pixels that would get drawn/discarded using transparent textures. Fascinating how technology changes, isn't it?

Sunday, July 26, 2009

Switching to a Macbook

About a month ago, I watched a presentation by Steve Jobs, where he presented the current line of Macbooks, and the technologies used in their creation. Every single slide he pulled out made my eyes pop out of my head, leaving me scrambling to pick them up and put them back in. At the end of the presentation, when I just couldn't seem to find where my eyes had rolled off to, I had subconciously decided that I would get one.

A week ago, my subconcious decision manifested itself, and here I find myself typing away on a shiny new aluminum piece of art n_n.

But naturally! I'm a game developer that uses XNA... What use would I have for a Mac? I did a little research beforehand, and discovered that it wasn't that hard to put Windows 7 on the machine (which I love dearly) and get it working properly. Without that, I daresay I'd never have made the purchase.

I never imagined Apple would play so well with Windows o.o

All I did to get the Windows OS installed on the computer was pop in the install disk, and open up Boot Camp. I chose the partition size, and then a regular old windows installation setup ensued. After 7 had been installed, I popped in my Apple restore disk, or whatever one it was, and installed boot camp. All the hardware worked! Except the video card, which I just went to Nvidia's site and downloaded their drivers... which then worked perfectly.

My macbook at the Windows 7 login screen... I love the glow-ey keyboard n_n

I have the model with two graphics cards in it, and this is truly epic. The idea is that you use the integrated graphics card part when you want to conserve battery life (6 hours!) and switch to the discreet card when you need the graphics. Unfortunately, Windows will only recognize one graphics card (the discreet one), and will not let you switch between the two at all. This leads to a fair bit shorter battery life while running windows (only around 3). While I find this mildly disapointing, it's quite bearable, as I can't imagine doing my powerhouse gaming on OS X, and I have no issue with doing creative art and or document work away from Windows. Not to mention Mac has Office 2008 ;)

Oh, and did I mention this thing doesn't have any fans or airflow stuff on the botttom of it...? It intakes through the keyboard, and sends the hot air into a neghboring parallel universe o.o