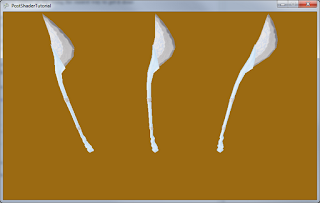
In this example, I will show you how to do a simple single pass post shader using basic color information. More advanced techniques will use more than just color information, and use multiple layers of post shaders. So for this example, we're just going to invert the colors of the screen!
I'm going to start with a basic project that draws a simple model to the screen, you can follow this tutorial here, or just download this project as a starting point. If you just need a 3D model to get you started, you're also welcome to use these: glaive model, glaive texture.
- Make a post shader
- Load it
- Create an off-screen surface to draw to
- Draw to the off-screen surface
- Draw the off-screen surface using the post shader
And fortunately, none of these bits are particularly hard. One or two might be a little arcane, but that's what webpage bookmarks and copy/paste are for ;)
We'll start at the top with defining our variables, so first! Define this in your Game1.cs, right below the GraphicsDeviceManager and SpriteBatch.
Effect         postShader;
RenderTarget2D offscreenSurface;
So the Effect will store our post shader, it's essentially the exact same thing as any other shader you might deal with, but the devil is in the details. You'll see exactly what I'm talking about when you get to the .fx file for it! The RenderTarget2D holds our off-screen surface, it's basically a Texture2D that's been specialized for having things rendered to it. You can also use it for things like mirrors or reflections on water, or even TV screens and security cameras!
Next would be initializing them. So in the Game1 LoadContent method, add these lines:
postShader       = Content.Load<Effect>("PostShader");
offscreenSurface = new RenderTarget2D(graphics.GraphicsDevice,
                                      graphics.GraphicsDevice.Viewport.Width,
                                      graphics.GraphicsDevice.Viewport.Height,
                                      false,
                                      graphics.GraphicsDevice.DisplayMode.Format,
                                      DepthFormat.Depth24);
We'll add in the PostShader.fx file shortly, but check out that constructor for RenderTarget2D! You can see there, we're specifying the viewport width and height. This tells it how large the texture we're storing for it will be. The values we're specifying here are exactly the same size of the window, but theoretically, we could make it smaller, or larger! Making it smaller could even be thought of as a performance optimization, as this texture will eventually get sampled up to the size of the window anyhow (I saw this as an option once in Unreal Tournament III, pretty spiffy!).
False there specifies no mip-maps, which would be pointless anyhow, since we aren't zooming in and out from the window. If you don't know about mip-maps, go learn about them, they're cool =D
The last two arguments specify to use the same color format as the screen, and a 24 bit zBuffer.
The remaining bit we need to code in C# is also pretty easy! At the top of the Draw method, add this line:
graphics.GraphicsDevice.SetRenderTarget(offscreenSurface);
Which should then be followed by whatever draw code you may have. What this line does, is tell the graphics card to draw everything from here on out to our specific off-screen surface! Instant awesome as far as I'm concerned~
Later in the Draw method, after base.Draw(gameTime), add in this remaining code:
graphics.GraphicsDevice.SetRenderTarget(null);

spriteBatch.Begin(SpriteSortMode.Immediate,
                  BlendState.Opaque,
                  null, null, null,
                  postShader);
spriteBatch.Draw (offscreenSurface,
                  new Rectangle(0,
                                0,
                                graphics.GraphicsDevice.Viewport.Width,
                                graphics.GraphicsDevice.Viewport.Height),
                  Color.White);
spriteBatch.End  ();

graphics.GraphicsDevice.DepthStencilState = DepthStencilState.Default;
The first line there clears the render target, letting the graphics card render to the screen again, instead of our off-screen surface.
The spriteBatch Begin allows us to set the card up for 2D drawing, and also lets us specify the shader as its last argument! This is the cool part, where we let the SpriteBatch do all the heavy lifting for us. Theoretically, we could create a quad with 3D geometry, set up a camera and a whole pile of things, draw our off-screen surface manually, but I've settled on this being the easiest way to get it done.
Drawing the off-screen surface is now exactly like drawing a regular 2D image onto the screen! Nothing complicated there =D
Then all the way at the end, we reset the DepthStencilState, as the SpriteBatch will change it for us when Begin is called. If we don't reset it, then we get all sorts of fun drawing artifacts in our 3D geometry.
The only thing that remains now is the shader! So right click on your content project and Add->New Item->Effect File, and call it "PostShader". Then completely replace the code there with this:
sampler TextureSampler : register( s0 );

float4 PixelShaderFunction(float2 UV : TEXCOORD0) : COLOR0
{
 float4 color  = tex2D(TextureSampler, UV);

 float4 result = float4(1, 1, 1, 1);
 result.xyz -= color.xyz;

 return result;
}

technique DefaultTechnique
{
 pass Pass1
 {
  PixelShader = compile ps_2_0 PixelShaderFunction();
 }
}
As you can see, this is where some strange things happen. There is no Vertex Shader in this effect file, just a Pixel Shader! We also aren't quite defining the sampler, merely pointing it to a register. Since we're taking advantage of the SpriteBatch for drawing our plane, we don't have to worry about those things. Our shader is almost like an override method, it just plops in and changes the behavior of the Pixel Shader only.
In this particular shader, the PixelShaderFunction gets called once for every single UV coordinate pair on the image you're trying to draw. The tex2D function then takes the UV coordinate and the sampler, and looks up the appropriate color, which we can then do whatever we like to =D
You can download the completed tutorial project (with comments!) here.

