Setting Up
So! Getting started. First we'll need a model to draw to screen! XNA supports .x and .fbx files by default, you can write or find plugins for other formats, but that's for another day. Be careful! Not all 3D file exporters are created equal! If you export a .x or .fbx from an application with a sub-standard exporter, XNA can't always read it. If you're having issues, try exporting from multiple tools, or playing with settings. If you haven't got anything on hand, here's a textured model I made that should work no problem =D
Glaive Model
Glaive Texture
Create a Windows Game (4.0) or a Windows Phone Game (4.0) project from Visual Studio, from here, we'll need to add the model and texture to our project. Browse to your project's location, and go into the Content project's folder (If you have Visual Studio Professional, you can right-click on your project and say 'Open Folder in Windows Explorer'). Copy your model and your texture(s) into this folder. After that, from Visual Studio, right click on your content project, and say 'Add->Existing Item', and select only the .fbx file! (If your files don't show up in the default location, you've put them in the wrong spot.)
Note: The reason we don't add the texture, is because the model should automatically link to the texture, and XNA will compile it from that. If you add it in manually, XNA will try compiling it twice. Once from the model link, and once from the manual addition. It's not a huge deal, but VS will give you a warning for it.
Code
Most of the code for this is pretty simple, definitely way more simple than what you used to have to do! I still have nightmares from DirectX 6 stuff.
We'll start by defining a variable to store our model in. This will go at the top of the Game1 class, right underneath SpriteBatch spriteBatch;
Model glaiveModel;To load the actual model into this variable, we need to wait until the GraphicsDevice has been properly initialized (GraphicDevice is our interface to the computer's graphics card, and since graphics data like models and textures reside in the graphics card's RAM, we need to have access to it before we can load stuff). Fortunately, the Microsoft.XNA.Framework.Game automatically calls LoadContent right after it creates the GraphicsDevice! So, anywhere in LoadContent, add this line:
glaiveModel = Content.Load<M odel>("glaive");
Content here is an object initialized by the Microsoft.Xna.Framework.Game, and is used to load and store most resources that your game will work with. If you're fuzzy on the odd <> syntax, you may wish to refresh a little on C# Generics. The string in this case refers to the model file itself! So if you're using something else, you'll want to change this. Something to note here, is that yes, there is no extension on that file name! This is because XNA's content system does some cool things. To visually see why, Right Click->Properties on your model in the content project. Note the Asset Name property.
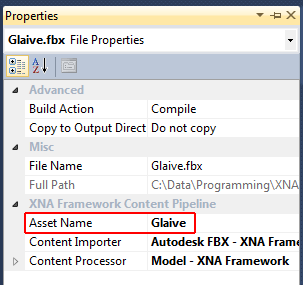 |
| And yes, you can change it. |
The last part is a little bit more complicated, as it involves drawing the model. As simple as XNA might be, drawing 3D stuff is still a complicated task! But they've made it a darn sight simpler than it used to be, that's for sure. So! In the Draw method, right after the call to GraphicsDevice.Clear
Matrix[] transforms = new Matrix[glaiveModel.Bones.Count];
glaiveModel.CopyAbsoluteBoneTransformsTo(transforms);
foreach (ModelMesh mesh in glaiveModel.Meshes)
{
foreach (BasicEffect effect in mesh.Effects)
{
effect.EnableDefaultLighting();
effect.World = transforms[mesh.ParentBone.Index] * Matrix.CreateRotationY((float)gameTime.TotalGameTime.TotalSeconds);
effect.View = Matrix.CreateLookAt(new Vector3(3, 4, 3), Vector3.Zero, Vector3.Up);
effect.Projection = Matrix.CreatePerspectiveFieldOfView( MathHelper.ToRadians(45.0f), GraphicsDevice.Viewport.AspectRatio, 0.1f, 1000.0f);
}
mesh.Draw();
}
Wooh~
Matrix[] transforms = new Matrix[glaiveModel.Bones.Count];
glaiveModel.CopyAbsoluteBoneTransformsTo(transforms);
The first two lines are a little weird, and really, it took me forever to figure out exactly what was going on with it. The basic idea is that it's one last transformation that gets applied to your object from the modeling tool. Often it's just the 'object' transform, any rotation, translation, or scaling that you applied to your entire model back in Maya, or Blender or whatever. Also, 3D applications often use different internal representations of 3D space. Some of them will say the Y axis is up, some of them will say the Z axis is up... and all sorts of other strange variations on that idea. This last transform is a great place for them to correct into whatever is standard for the model format!
foreach (ModelMesh mesh in glaiveModel.Meshes)
{
foreach (BasicEffect effect in mesh.Effects)
{
After that, the two foreach loops just iterate through all the meshes and shaders/effects that are stored in the model. Yes, models will frequently contain multiple meshes in them! Most frequently, this is because they use different materials.
foreach (BasicEffect effect in mesh.Effects)
{
effect.EnableDefaultLighting();
The BasicEffect class is a default shader that XNA applies to all Models loaded in the regular fashion. It's just a nice, convenient tool to get you up and running really quick. Usually, this will get replaced by a custom shader/effect as your game gets more visually appealing. If you aren't sure what a shader is, it's basically a small bit of code that runs on the graphics card and describes exactly how 3D geometry gets transformed and lit/colored onto the screen, hence the light and position info.
effect.World = transforms[mesh.ParentBone.Index] * Matrix.CreateRotationY((float)gameTime.TotalGameTime.TotalSeconds);
This bit here is the basic transformation information. As mentioned before, that first bit, transforms[mesh.ParentBone.Index] is just a reference to that last transform stored by the modeling tool, but the call to Matrix.CreateRotationY is actually going to give a rotation to the model around the Y axis based on time.
effect.View = Matrix.CreateLookAt(new Vector3(3, 4, 3), Vector3.Zero, Vector3.Up);
effect.Projection = Matrix.CreatePerspectiveFieldOfView( MathHelper.ToRadians(45.0f), GraphicsDevice.Viewport.AspectRatio, 0.1f, 1000.0f);
These two lines deal with camera information. One of the issues with 3D space, is that you have to tell exactly where you're looking from. Frequently this can be kinda tricky, but fortunately, Matrix.CreateLookAt is a pretty easy solution for a really basic 3D scene. All you have to do is specify where the camera is, where it's looking at, and what direction is up! A little less intuitive is the projection, which describes how 3D information gets squished into 2D polygons that can then actually be drawn on your 2D monitor. The first argument is the field of view, which basically describes how much of the 360 degrees of space you can see at any given time. Computer math works with radians, rather than degrees, so we use a nice XNA utility to convert it for us. After that, it needs to make sure the polygons are stretched to match the width/height ratio, or aspect ratio of your monitor. The last two are the near and far clipping plane, or how close and how far can object be drawn without getting ignored.
mesh.Draw();
This one then, just takes all the settings provided, and draws to screen! Yay~!
 |
| I like to think it's a nice model too =D |