Showing posts with label C#. Show all posts

Friday, May 16, 2014

ScriptableObjects in Unity and how/why you should use them!

I relatively recently discovered Unity's ScriptableObjects, and fell in love with them immediately. For some reason, you don't see them around a whole lot, yet they solve a number of important problems, like... How do you store data in Unity? I assure you, my early attempts were quite horrific.

The problem

Lets imagine you have a shooting game. Guns are an integral part of a game like this, and so you need lots of guns in your game! In theory, you could just prefab all your guns, and work with them that way, and in a simple world, this generally works pretty well! But in this game, you need to interact with these guns in a lot of different ways, selecting them, customizing them, stat tweaking them, admiring their detail, shooting them, etc. Having all that in a prefab becomes ridiculous quite quickly!

I did mention lots of guns, right?

Soo, the next intuitive leap is to do some sort of data file, XML, JSON, plain text, or whatever. The problem with this is zero tie-in with the Unity editor itself! At least, not without a substantial amount of extra work. That might be acceptable after enough work, but ScriptableObjects provide a significantly better alternative!

The solution

ScriptableObject is a class, very much like the MonoBehaviour, without a lot of the component specific items. It gets serialized, saved, and loaded automatically through Unity, as well as standard inspector window support! You can easily spot Unity using ScriptableObjects in the Edit->Project Settings menu, and other similar locations. Unfortunately, Unity didn't make it quite as simple to use, you really won't find anything mentioned about ScriptableObjects in the UI.

So how do we use 'em? Lucky for us, it's relatively trivial~
Step 1. Inherit from ScriptableObject
Step 2. Treat it like a MonoBehaviour without events.
Step 3. Tie it into the editor.

Tying it into the editor can be fun, but here is where you get some handy-dandy code =D Unity treats ScriptableObjects the same way it does everything else, so you have to create an asset file, and add it to the file system!

The code

This is a little function I use that will create an asset for any ScriptableObject that I throw at it. I usually keep it around in a tiny little utility file I call SOUtil.cs (click here to download it!) It looks like this:
#if UNITY_EDITOR
    public static void CreateAsset(System.Type aType, string aBaseName) {
        ScriptableObject style = ScriptableObject.CreateInstance(aType);

        string path = UnityEditor.AssetDatabase.GetAssetPath(UnityEditor.Selection.activeInstanceID);
        if (System.IO.Path.GetExtension(path) != "") path = System.IO.Path.GetDirectoryName(path);
        if (path                              == "") path = "Assets";

        string name = path + "/" + aBaseName + ".asset";
        int    id   = 0;
        while (UnityEditor.AssetDatabase.LoadAssetAtPath(name, aType) != null) {
            id  += 1;
            name = path + "/" + aBaseName + id + ".asset";
        }

        UnityEditor.AssetDatabase.CreateAsset(style, name);
        UnityEditor.AssetDatabase.SaveAssets();

        UnityEditor.EditorUtility.FocusProjectWindow();
        UnityEditor.Selection    .activeObject = style;
    }
#endif

As you can see, this is a pretty darned generic function. It creates an object, finds a path for it, gives it a default name, saves it, and then sets it as the user's focus! One thing to keep in mind when working with ScriptableObject, you shouldn't create them using the 'new' keyword. Always use ScriptableObject.CreateInstance.

Ok, cool! That's the generic part, now, what about actually tying in specific objects? Well, here's a super simple object to give you a good idea about that.
public class SOString : ScriptableObject {
    public string stringValue = "";

#if UNITY_EDITOR
    const string editorMenuName = "String";
    [UnityEditor.MenuItem("GameObject/Create Scriptable Object/Create " + editorMenuName, false, 0  ), 
     UnityEditor.MenuItem("Assets/Create/Create Scriptable Object/"     + editorMenuName, false, 101)]
    public static void CreateAsset() {
        SOUtil.CreateAsset(System.Reflection.MethodBase.GetCurrentMethod().DeclaringType, editorMenuName);
    }
#endif
}

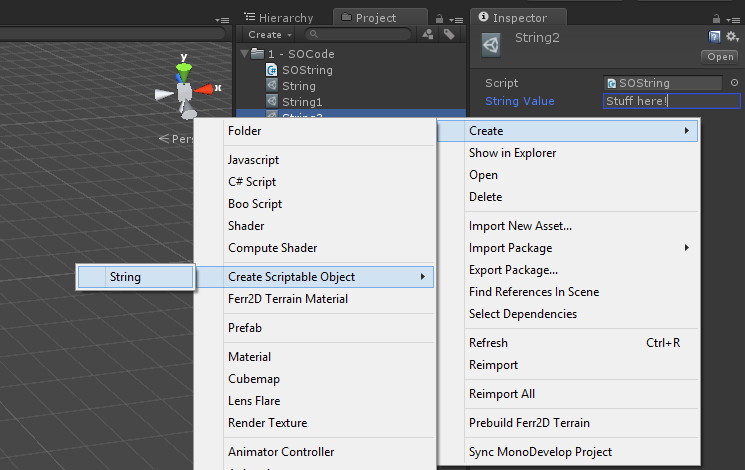
Not that hard. A couple of menu tie-ins, for the GameObject menu, and the project window context menu, and then a call to our CreateAsset method, automatically picking type through reflection, and providing a default asset name! Now you can drag and drop these little suckers all around your inspectors, just like any other GameObject or MonoBehaviour!

Editor code is darned cool.
Enjoy =D

Sunday, June 23, 2013

Quickly placing random objects in a landscape without overlap

For me, creating procedural content is one of the most awesome things ever! Despite having created it yourself, you're still not quite sure what you'll expect this time. So today I'm going to discuss a problem that I often have: placing objects randomly in a scene, without having them overlap eachother!

It's a small scene, but nothing's overlapping, not even with the path. Looks like the code works to me!

The easiest approach to creating a random landscape is to just launch into a for loop, and just start assigning random coordinate! And that's often pretty great all by itself, but you'll get -tons- of overlap.

Sooo... let's just check if it overlaps with anything, and if it does, assign it a new random position? Great! What if there's no room, or very little room? You could easily spend a lot of loops trying to pick a good spot, or even worse, catch yourself in an infinite loop. It also takes an unpredictable duration, which is generally a bad idea.

The solution I've decided on isn't perfect, but it is a decent approximate, and it's fairly fast. The idea is to create a grid over the area, and use each cell in it to store the distance to the nearest object. If we're using a bounding circle to determine where an object will fit, then these values should instantly tell us whether or not that cell is a valid location!

ASCII Visualizations are the best.

As you can see here, we've got an ASCII gradient, to show distance from a single placed object, with 'x' marking the actual areas the object takes up. The data is actually stored as floats, so it's very simple to tell the actual distance. Here's the code I used to make it:

PlacerRandom random = new PlacerRandom(0);
Placer placer = new Placer(20, 20, random);
placer.PlaceCircle(4, 4, 2);
placer.DebugDistance();

You can find the Placer code at the bottom of this post. From here, it's pretty simple to pick out valid cells, and then choose one of those to spawn your object at. Using the placer's GetCircle method, you can pick out a random location that will fit a given radius.

This scene contains a path, and 4 objects. It looks a bit more confusing.

I also discovered the need to add paths through my world, so I wanted to be able to set lines that would be clear of stuff. Using the closest point on a line algorithm with a distance test, it's not hard to do exactly the same sort of thing with a line. Here's the code I used to create this scene:

PlacerRandom random = new PlacerRandom(0);
Placer placer = new Placer(20, 20, random);
placer.PlaceLine(0, 8, 20, 15, 1f);
   
float x = 0, y = 0;
float radius = 2;
for (int i = 0; i < 4; i++) {
 placer.GetCircle(radius, out x, out y);
 placer.PlaceCircle(x, y, radius);
}
placer.DebugDistance();

The speed for these is pretty excellent on small maps, for a 32x32 grid, getting and placing 100 circles was about 3ms on my machine. Unfortunately, this goes up pretty fast, with a 128x128 grid taking about 33ms for the same thing. Fortunately, it's not likely you'll be doing this sort of thing every frame, but if you're generating tiles as you move, having a hiccup might not be ideal either.

There's plenty of room for optimization, better math, different distance algorithms, silly things, but it's already pretty workable.

Oh, and don't forget, even after you've placed all those objects, that distance information can still be pretty handy! As you can see in my leading image, I've used it to do some fake shadow estimates. With a bit of tweaking, that'll look excellent =D

You can download the code for Placer.cs and PlacerRandom.cs. I haven't really polished them yet, I still consider them a WIP , but it should be pretty easy to use! Also, this code should work right away in Unity.

Sunday, March 25, 2012

Basic XNA Post Shader Tutorial

So here's going to be a really simple, basic introduction to post shaders in XNA! If you aren't familiar with what a post shader is, try thinking of the popular special effects like Bloom, or Motion Blur. These are special effects that get done after the entire screen has been completely drawn! A shader or two is then used to manipulate the resulting image to do something cool.

In this example, I will show you how to do a simple single pass post shader using basic color information. More advanced techniques will use more than just color information, and use multiple layers of post shaders. So for this example, we're just going to invert the colors of the screen!

I'm going to start with a basic project that draws a simple model to the screen, you can follow this tutorial here, or just download this project as a starting point. If you just need a 3D model to get you started, you're also welcome to use these: glaive model, glaive texture.


These are the things that we'll need to do to get this post stuff working:

  • Make a post shader
  • Load it
  • Create an off-screen surface to draw to
  • Draw to the off-screen surface
  • Draw the off-screen surface using the post shader
And fortunately, none of these bits are particularly hard. One or two might be a little arcane, but that's what webpage bookmarks and copy/paste are for ;)

We'll start at the top with defining our variables, so first! Define this in your Game1.cs, right below the GraphicsDeviceManager and SpriteBatch.

Effect         postShader;
RenderTarget2D offscreenSurface;

So the Effect will store our post shader, it's essentially the exact same thing as any other shader you might deal with, but the devil is in the details. You'll see exactly what I'm talking about when you get to the .fx file for it! The RenderTarget2D holds our off-screen surface, it's basically a Texture2D that's been specialized for having things rendered to it. You can also use it for things like mirrors or reflections on water, or even TV screens and security cameras!

Next would be initializing them. So in the Game1 LoadContent method, add these lines:

postShader       = Content.Load<Effect>("PostShader");
offscreenSurface = new RenderTarget2D(graphics.GraphicsDevice,
                                      graphics.GraphicsDevice.Viewport.Width,
                                      graphics.GraphicsDevice.Viewport.Height,
                                      false,
                                      graphics.GraphicsDevice.DisplayMode.Format,
                                      DepthFormat.Depth24);

We'll add in the PostShader.fx file shortly, but check out that constructor for RenderTarget2D! You can see there, we're specifying the viewport width and height. This tells it how large the texture we're storing for it will be. The values we're specifying here are exactly the same size of the window, but theoretically, we could make it smaller, or larger! Making it smaller could even be thought of as a performance optimization, as this texture will eventually get sampled up to the size of the window anyhow (I saw this as an option once in Unreal Tournament III, pretty spiffy!).

False there specifies no mip-maps, which would be pointless anyhow, since we aren't zooming in and out from the window. If you don't know about mip-maps, go learn about them, they're cool =D

The last two arguments specify to use the same color format as the screen, and a 24 bit zBuffer.

The remaining bit we need to code in C# is also pretty easy! At the top of the Draw method, add this line:

graphics.GraphicsDevice.SetRenderTarget(offscreenSurface);

Which should then be followed by whatever draw code you may have. What this line does, is tell the graphics card to draw everything from here on out to our specific off-screen surface! Instant awesome as far as I'm concerned~

Later in the Draw method, after base.Draw(gameTime), add in this remaining code:

graphics.GraphicsDevice.SetRenderTarget(null);

spriteBatch.Begin(SpriteSortMode.Immediate, 
                  BlendState.Opaque, 
                  null, null, null, 
                  postShader);
spriteBatch.Draw (offscreenSurface, 
                  new Rectangle(0, 
                                0, 
                                graphics.GraphicsDevice.Viewport.Width, 
                                graphics.GraphicsDevice.Viewport.Height), 
                  Color.White);
spriteBatch.End  ();

graphics.GraphicsDevice.DepthStencilState = DepthStencilState.Default;

The first line there clears the render target, letting the graphics card render to the screen again, instead of our off-screen surface.

The spriteBatch Begin allows us to set the card up for 2D drawing, and also lets us specify the shader as its last argument! This is the cool part, where we let the SpriteBatch do all the heavy lifting for us. Theoretically, we could create a quad with 3D geometry, set up a camera and a whole pile of things, draw our off-screen surface manually, but I've settled on this being the easiest way to get it done.

Drawing the off-screen surface is now exactly like drawing a regular 2D image onto the screen! Nothing complicated there =D

Then all the way at the end, we reset the DepthStencilState, as the SpriteBatch will change it for us when Begin is called. If we don't reset it, then we get all sorts of fun drawing artifacts in our 3D geometry.

The only thing that remains now is the shader! So right click on your content project and Add->New Item->Effect File, and call it "PostShader". Then completely replace the code there with this:

sampler TextureSampler : register( s0 );

float4 PixelShaderFunction(float2 UV : TEXCOORD0) : COLOR0
{
 float4 color  = tex2D(TextureSampler, UV);

 float4 result = float4(1, 1, 1, 1);
 result.xyz -= color.xyz;

 return result;
}

technique DefaultTechnique
{
 pass Pass1
 {
  PixelShader = compile ps_2_0 PixelShaderFunction();
 }
}

As you can see, this is where some strange things happen. There is no Vertex Shader in this effect file, just a Pixel Shader! We also aren't quite defining the sampler, merely pointing it to a register. Since we're taking advantage of the SpriteBatch for drawing our plane, we don't have to worry about those things. Our shader is almost like an override method, it just plops in and changes the behavior of the Pixel Shader only.

In this particular shader, the PixelShaderFunction gets called once for every single UV coordinate pair on the image you're trying to draw. The tex2D function then takes the UV coordinate and the sampler, and looks up the appropriate color, which we can then do whatever we like to =D


Now you can tweak it and play with it however you feel like!

You can download the completed tutorial project (with comments!) here.